First step was to install the mSATA drive onto the 6501. The various ports on the board seem to be sharing buses so you may have to experiment if you are using USB and other ports but this location for the mSATA worked fine for me

Next we need to download PFSense to load on to the 6501, this is where it starts getting tricky.
PFSense is built on Free BSD. Since PFSense version 2.2 it has been built using version 10.x of Free BSD. There seems to be an issue with Free BSD version 10.x that stops the 6501 board from booting from the mSATA drive after PF Sense has been installed. The latest version of PFSense is 2.3.2 and still has the problem of booting from mSATA.
I got around this issue by loading an older version of PFSense and then upgrading from within that version of PFSense.
The version of PFSense I used was 2.1.3 this does not appear as an option to download from the main PFSense site so you may have to dig around on the internet to find it. I found it at this mirror site.
The version that I used was
This is used it install via a USB memory stick and has a serial console
Download the file and write it to a memory stick and make sure that the memory stick is bootable, I used a Windows program called Rufus or use your other favourite memory stick writing program.
Once you have PFSense 2.1.3 on a memory stick and you have your mSATA installed in your 6501 you are nearly ready to install
If you are connecting to the 6501 via the serial port you will need a program such as Putty. Putty initially needs to be set to 19200 8 data bits 1 stop bit and no parity to talk to the 6501 but you will also need 9600 and 115200. This is because PFSense 2.1.3 uses 9600 but when you update to the latest version that will use 115200.
When you boot the 6501 you should see a screen as below when it has booted

Type Show
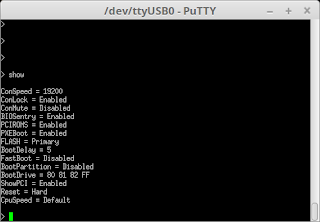
You can see the console speed is set to 19200 and the bootdrive is set to 80 81 82 the mSATA drive will be 80 and the USB memory stick will be 81. You can change these settings if you want to but you will have to take the console lock off first by typing
ConLock=disabled
If you are happy with the settings insert the memory stick into the USB port next to the console port and make a short press on the reset button
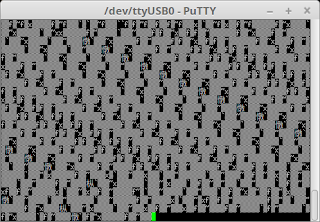
The 6501 will reboot and seem to have rubbish on the screen
Restart Putty at 9600 and connect to the 6501 you should then see that PFSense is loading from the memory stick
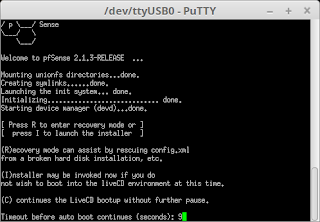
Pressing I will invoke the installer.
Install PFSense by following the on screen menus
You should have the 6501 connected to your network via an Ethernet cable
The Quick and Easy option worked for me
When the progress bar reaches 100% you should see this screen
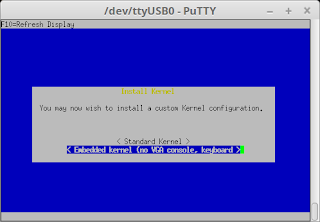
Select "Embedded Kernel" this will allow the serial port to still work after reboot the standard kernel will not. Some more data will be written to the mSATA before you see this screen
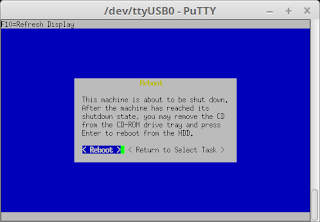
Select "Reboot" Hopefully the 6501 will reboot into the installed PFSense on the mSATA and not the memstick installer program. If it does boot the installer remove the memory stick and reboot the 6501. If it still does not boot check the bootdrive setting of the 6501 it should be 80 first.
Hopefully PFSense will run correctly and you should see this screen, Select "n" for setting up the VLANs
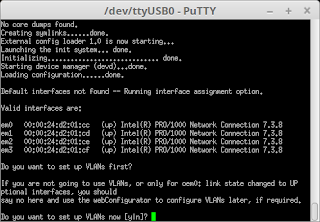
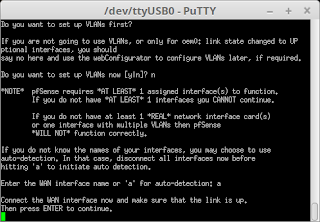
Select "a" for auto detection of the WAN interface
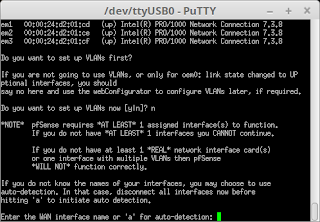
Connect the network to the 6501 ETH 0 port, if already connected remove and reinsert the cable. Then press "ENTER"
The connection should have been detected, if not repeat auto detection and and remove and reinsert the cable until it is.
You will then be asked about setting up the LAN interface, we can ignore that at this point, Just hit enter
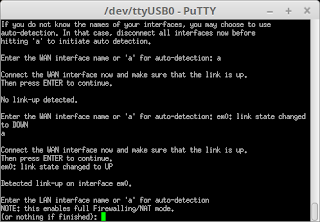
select "y" to assign the WAN interface
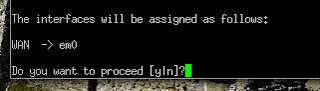
Eventually you should see this screen
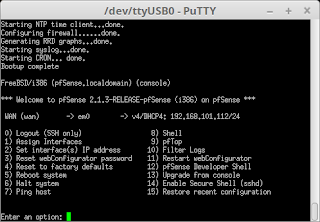
Option 13 should allow you to update PFSense from the console but I had no luck doing it that way. However I did do it this way.
Using you favourite browser connect to the ip address shown for the WAN, in this case 192.168.101.112

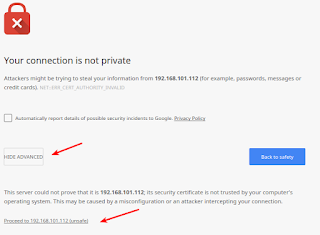
You will probably get a message saying your connection is not private, click advanced and then proceed
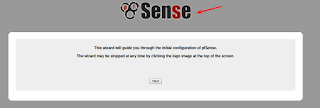
Login to PFSense. The user name is admin and the password is pfsense

Click the logo at the top of the screen to stop the wizard
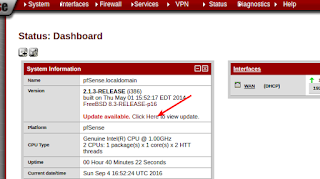
On the Dashboard click on "Click Here" next to Update Available
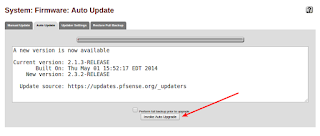
Click the "Invoke Auto Upgrade" button
The new version will down load, install and reboot the 6501
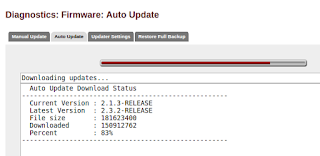
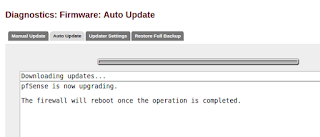
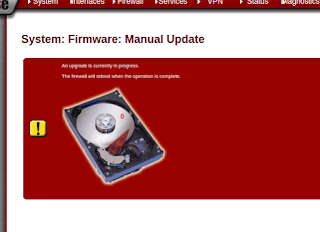
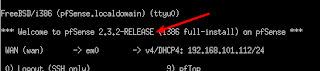
PFSense will eventually reboot, it may take 5 mins or more. If you now want to contect to PFSEnse with the serial console then you will have to use Putty set at 115200.
As you can see PFSense is now at version 2.3.2
Logging back in with you browser also shows PFSense at the latest build
You now need to set up PFSense to your requirements.


You can see the console speed is set to 19200 and the bootdrive is set to 80 81 82 the mSATA drive will be 80 and the USB memory stick will be 81. You can change these settings if you want to but you will have to take the console lock off first by typing
ConLock=disabled
If you are happy with the settings insert the memory stick into the USB port next to the console port and make a short press on the reset button
The 6501 will reboot and seem to have rubbish on the screen

Restart Putty at 9600 and connect to the 6501 you should then see that PFSense is loading from the memory stick

Pressing I will invoke the installer.
Install PFSense by following the on screen menus
You should have the 6501 connected to your network via an Ethernet cable
The Quick and Easy option worked for me
When the progress bar reaches 100% you should see this screen

Select "Embedded Kernel" this will allow the serial port to still work after reboot the standard kernel will not. Some more data will be written to the mSATA before you see this screen

Select "Reboot" Hopefully the 6501 will reboot into the installed PFSense on the mSATA and not the memstick installer program. If it does boot the installer remove the memory stick and reboot the 6501. If it still does not boot check the bootdrive setting of the 6501 it should be 80 first.
Hopefully PFSense will run correctly and you should see this screen, Select "n" for setting up the VLANs

Select "a" for auto detection of the WAN interface

Connect the network to the 6501 ETH 0 port, if already connected remove and reinsert the cable. Then press "ENTER"

The connection should have been detected, if not repeat auto detection and and remove and reinsert the cable until it is.
You will then be asked about setting up the LAN interface, we can ignore that at this point, Just hit enter

select "y" to assign the WAN interface

Eventually you should see this screen

Option 13 should allow you to update PFSense from the console but I had no luck doing it that way. However I did do it this way.
Using you favourite browser connect to the ip address shown for the WAN, in this case 192.168.101.112
You will probably get a message saying your connection is not private, click advanced and then proceed

Login to PFSense. The user name is admin and the password is pfsense

Click the logo at the top of the screen to stop the wizard

On the Dashboard click on "Click Here" next to Update Available

Click the "Invoke Auto Upgrade" button

The new version will down load, install and reboot the 6501


PFSense will eventually reboot, it may take 5 mins or more. If you now want to contect to PFSEnse with the serial console then you will have to use Putty set at 115200.
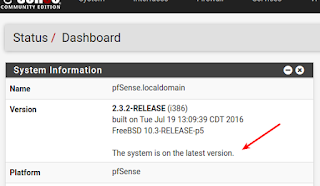
As you can see PFSense is now at version 2.3.2

Logging back in with you browser also shows PFSense at the latest build

You now need to set up PFSense to your requirements.
Malcys Adventures In Computer Land: Installing Pfsense On Soekris Net6501 With Msata Drive >>>>> Download Now
ReplyDelete>>>>> Download Full
Malcys Adventures In Computer Land: Installing Pfsense On Soekris Net6501 With Msata Drive >>>>> Download LINK
>>>>> Download Now
Malcys Adventures In Computer Land: Installing Pfsense On Soekris Net6501 With Msata Drive >>>>> Download Full
>>>>> Download LINK Vj